【开发环境】 Ubuntu14.04 安装Skyeye 1.3.5过程
来源:未知网络整理 网络用户发布,如有版权联系网管删除 2018-07-10
一. 前言
Skyeye是一个嵌入式开发板模拟软件,支持多种指令集、多种CPU。本文介绍Skyeye-1.3.5工具的安装。基于以下环境:
1. Ubuntu14.04 LTS (32位), 运行于VMWare虚拟机中;
2. Skyeye-1.3.5;
二、 准备
1. 下载Skyeye-1.3.5源代码
下载地址:https://sourceforge.net/projects/skyeye/files/skyeye/
hello@hello-pc:~/Desktop$ ls skyeye-1.3.5_rc1.tar.bz2skyeye-1.3.5_rc1.tar.bz2hello@hello-pc:~/Desktop$ tar -vxf skyeye-1.3.5_rc1.tar.bz2
2. 下载并安装所需依赖库(libiconv-1.14.tar.gz);
(说明:此处参考:http://www.codeweblog.com/skyeye-1-3-5安装过程)
hello@hello-pc:~/Desktop$ ls libiconv-1.14.tar.gzlibiconv-1.14.tar.gzhello@hello-pc:~/Desktop$ tar -vxf libiconv-1.14.tar.gz
hello@hello-pc:~/Desktop$ cd libiconv-1.14/ Python-2.7/ skyeye-testsuite-1.3.4_rc1/ vmware-tools-distrib/hello@hello-pc:~/Desktop$ cd libiconv-1.14/hello@hello-pc:~/Desktop/libiconv-1.14$ lsABOUT-NLS ChangeLog configure DESIGN HACKING libtool man PORTS src THANKSaclocal.m4 config.h configure.ac djgpp include m4 NEWS preload srclib toolsAUTHORS config.h.in COPYING doc INSTALL.generic Makefile NOTES README srcm4 windowsautogen.sh config.log COPYING.LIB extras lib Makefile.devel os2 README.djgpp stamp-h1 woe32dllbuild-aux config.status DEPENDENCIES gnulib-local libcharset Makefile.in po README.woe32 testshello@hello-pc:~/Desktop/libiconv-1.14$ ./configure ; sudo make ; sudo make install
若make install过程出现错误:./stdio.h:1010:1: error: 'gets' undeclared here (not in a function),需要修改如下:
(说明:此处参考:http://blog.csdn.net/chentianveiko/article/details/51498831)
hello@hello-pc:~/Desktop/libiconv-1.14$ gvim ./srclib/stdio.h
1 _GL_CXXALIAS_SYS (gets, char *, (char *s)); 2 # undef gets 3 # endif 4 _GL_CXXALIASWARN (gets); 5 /* It is very rare that the developer ever has full control of stdin, 6 so any use of gets warrants an unconditional warning. Assume it is 7 always declared, since it is required by C89. */ 8 #if defined(__GLIBC__) && !defined(__UCLIBC__) && !__GLIBC_PREREQ(2, 16) /*Add here*/ 9 _GL_WARN_ON_USE (gets, "gets is a security hole - use fgets instead");10 #endif 11 12 #endif
3. 下载并安装所需依赖库(Python-2.7);
(说明:此处参考:http://www.codeweblog.com/skyeye-1-3-5安装过程)
hello@hello-pc:~/Desktop$ cd Python-2.7/hello@hello-pc:~/Desktop/Python-2.7$ lsbuild configure.in Include libpython2.7.so Makefile Modules PCbuild Python setup.pyconfig.log Demo install-sh libpython2.7.so.1.0 Makefile.pre Objects pyconfig.h python-gdb.py Toolsconfig.status Doc Lib LICENSE Makefile.pre.in Parser pyconfig.h.in READMEconfigure Grammar libpython2.7.a Mac Misc PC python RISCOShello@hello-pc:~/Desktop/Python-2.7$ ./configure --enable-shared --enable-unicode=ucs4hello@hello-pc:~/Desktop/Python-2.7$ sudo makehello@hello-pc:~/Desktop/Python-2.7$ sudo make install
说明:若不正常安装Python-2.7, skyeye安装会出现如下错误;
sudo apt-get install python-dev
-g -O2 -MT pycli.lo -MD -MP -MF .deps/pycli.Tpo -c -o pycli.lo `test -f 'pycli/pycli.c' || echo './'`pycli/pycli.c/bin/bash: python-config: command not foundlibtool: compile: gcc -g -O2 -D_FILE_OFFSET_BITS=64 -DSTANDALONE -DDEFAULT_INLINE=0 -DSKYEYE_BIN=\"/opt/skyeye/bin/\" -g -O2 -Werror-implicit-function-declaration -Werror=return-type -Wmissing-field-initializers -Wuninitialized -I. -I.. -I../third-party/include/ -I../third-party/bfd/ -I../third-party/bfd/ -I../common -I../common/include -I./common/ -g -O2 -MT pycli.lo -MD -MP -MF .deps/pycli.Tpo -c pycli/pycli.c -fPIC -DPIC -o .libs/pycli.opycli/pycli.c:1:20: fatal error: Python.h: No such file or directory #include ^compilation terminated.make[2]: *** [pycli.lo] Error 1make[2]: Leaving directory `/home/hello/skyeye/skyeye-1.3.5_rc1/utils'make[1]: *** [all-recursive] Error 1make[1]: Leaving directory `/home/hello/skyeye/skyeye-1.3.5_rc1'make: *** [all] Error 2hello@hello-pc:~/skyeye/skyeye-1.3.5_rc1$ gvim pycli/pycli.c
4. 安装所需依赖库
hello@hello-pc:~/Desktop/Python-2.7$ sudo apt-get install libgtk2.0-dev pkg-config libatk1.0-devhello@hello-pc:~/Desktop/Python-2.7$ sudo apt-get install libpango1.0-dev libfreetype6-dev libglib2.0-dev libx11-dev binutils-devhello@hello-pc:~/Desktop/Python-2.7$ sudo apt-get install libncurses5-dev libxpm-dev libltdl-devhello@hello-pc:~/Desktop/Python-2.7$
三、 安装Skyeye-1.3.5
hello@hello-pc:~/Desktop$ cd ../skyeye/skyeye-1.3.5_rc1/hello@hello-pc:~/skyeye/skyeye-1.3.5_rc1$ lsaclocal.m4 bochs_config.h.in config.log Doxyfile ltdlconf.h Makefile.in pyshell stamp-h2android ChangeLog config.status emulator ltdlconf.h.in misc README stamp-h3android_emulator.o common config.sub gui ltmain.sh missing REPORTING-BUGS testsuitearch conf configure INSTALL m4 mknandflashdump setenv.o third-partyAUTHORS config.guess configure.in install-sh MAINTAINERS mknandflashdump.o skyeye TODOautogen.sh config.h COPYING libltdl Makefile NEWS skyeye.o uart_console.oautom4te.cache config.h.in depcomp libtool Makefile.am prof_convert soc uart_instancebochs_config.h config.h.in~ device LICENSE Makefile.android prof_convert.o stamp-h1 utilshello@hello-pc:~/skyeye/skyeye-1.3.5_rc1$ sudo makehello@hello-pc:~/skyeye/skyeye-1.3.5_rc1$ sudo make installhello@hello-pc:~/skyeye/skyeye-1.3.5_rc1$ sudo make install_libhello@hello-pc:~/skyeye/skyeye-1.3.5_rc1$
四、启动skyeye
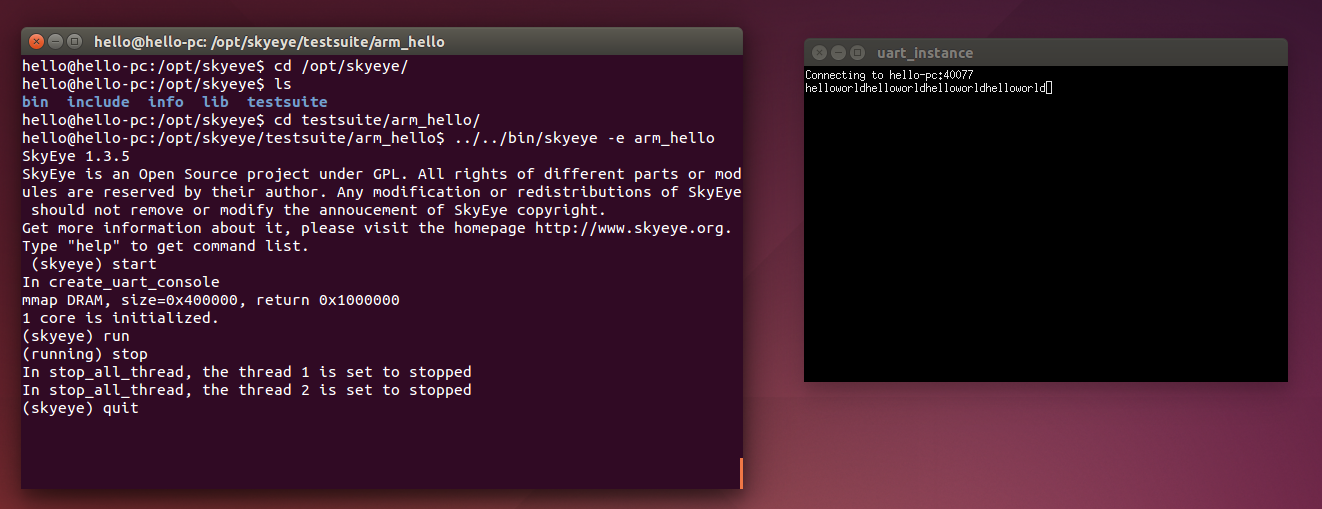
hello@hello-pc:/opt/skyeye$ cd /opt/skyeye/hello@hello-pc:/opt/skyeye$ lsbin include info lib testsuitehello@hello-pc:/opt/skyeye$ cd testsuite/arm_hello/hello@hello-pc:/opt/skyeye/testsuite/arm_hello$ ../../bin/skyeye -e arm_hello SkyEye 1.3.5SkyEye is an Open Source project under GPL. All rights of different parts or modules are reserved by their author. Any modification or redistributions of SkyEye should not remove or modify the annoucement of SkyEye copyright. Get more information about it, please visit the homepage http://www.skyeye.org.Type "help" to get command list. (skyeye)
运行简单arm_hello实例效果如下:

查看评论 回复
"【开发环境】 Ubuntu14.04 安装Skyeye 1.3.5过程"的相关文章
- 上一篇:BJ-EPM240 CPLD开发板学习板 MAX II 特权同学FPGA入门 altera
- 下一篇:没有了
热门文章
- 【开发环境】 Ubuntu14.04 安装Skyeye 1.3.5过程
- BJ-EPM240 CPLD开发板学习板 MAX II 特权同学FPGA入门
- PIC KIT3 脱机/编程/仿真/进口usb座 pickit3 编程器
- 进口单片机 ATMEGA48V-10AU 贴片 TQFP32 质量保证 主
- 深圳市梦想科技电子
- ATMEGA128A-AU ATmega128L-8AU -16AU TQFP64贴片全新
- PIC16F716-I/SO 16F716 PIC16F716 18-SOIC【IC PWM CT
- 金利达单片机
- HCS300-I/SN SOP8 无线滚动解码芯片 原装正品 量大价
- STM32F103CBT6 品牌ST封装LQFP48
