
AndroidAPK加壳技术方案【1】

小编有话说
由于上次小编发的反编译技术加壳技术不全面,所以小编又重新搜集两篇关于加壳技术的文章。希望这次能够帮到大家。
http://blog.csdn.net/jiazhijun/article/details/8678399
作者:Jack_Jia 邮箱: 309zhijun@163.com
一、什么是加壳?
加壳是在二进制的程序中植入一段代码,在运行的时候优先取得程序的控制权,做一些额外的工作。大多数病毒就是基于此原理。PC EXE文件加壳的过程如下:

二、加壳作用
加壳的程序可以有效阻止对程序的反汇编分析,以达到它不可告人的目的。这种技术也常用来保护软件版权,防止被软件破解。
三、Android Dex文件加壳原理
PC平台现在已存在大量的标准的加壳和解壳工具,但是Android作为新兴平台还未出现APK加壳工具。Android Dex文件大量使用引用给加壳带来了一定的难度,但是从理论上讲,Android APK加壳也是可行的。
在这个过程中,牵扯到三个角色:
1、加壳程序:加密源程序为解壳数据、组装解壳程序和解壳数据
2、解壳程序:解密解壳数据,并运行时通过DexClassLoader动态加载
3、源程序:需要加壳处理的被保护代码
阅读该文章,需要您对DEX文件结构有所了解,您可以通过以下网址了解相关信息:
http://blog.csdn.net/jiazhijun/article/details/8664778
根据解壳数据在解壳程序DEX文件中的不同分布,本文将提出两种Android Dex加壳的实现方案。
(一)解壳数据位于解壳程序文件尾部
该种方式简单实用,合并后的DEX文件结构如下。
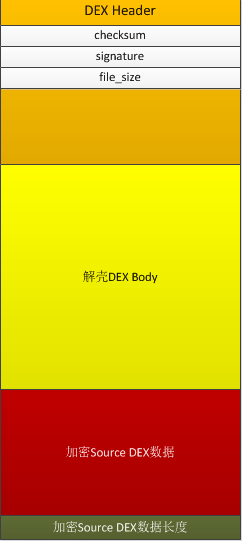
加壳程序工作流程:
1、加密源程序APK文件为解壳数据
2、把解壳数据写入解壳程序Dex文件末尾,并在文件尾部添加解壳数据的大小。
3、修改解壳程序DEX头中checksum、signature 和file_size头信息。
4、修改源程序AndroidMainfest.xml文件并覆盖解壳程序AndroidMainfest.xml文件。
解壳DEX程序工作流程:
1、读取DEX文件末尾数据获取借壳数据长度。
2、从DEX文件读取解壳数据,解密解壳数据。以文件形式保存解密数据到a.APK文件
3、通过DexClassLoader动态加载a.apk。
(二)解壳数据位于解壳程序文件头
该种方式相对比较复杂, 合并后DEX文件结构如下:
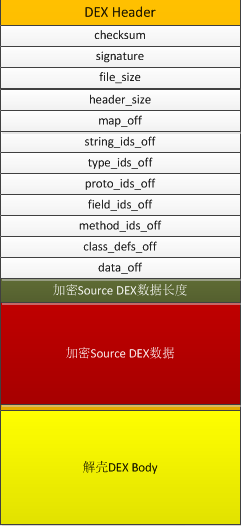
加壳程序工作流程:
1、加密源程序APK文件为解壳数据
2、计算解壳数据长度,并添加该长度到解壳DEX文件头末尾,并继续解壳数据到文件头末尾。
(插入数据的位置为0x70处)
3、修改解壳程序DEX头中checksum、signature、file_size、header_size、string_ids_off、type_ids_off、proto_ids_off、field_ids_off、
method_ids_off、class_defs_off和data_off相关项。 分析map_off 数据,修改相关的数据偏移量。
4、修改源程序AndroidMainfest.xml文件并覆盖解壳程序AndroidMainfest.xml文件。
解壳DEX程序工作流程:
1、从0x70处读取解壳数据长度。
2、从DEX文件读取解壳数据,解密解壳数据。以文件形式保存解密数据到a.APK
3、通过DexClassLoader动态加载a.APK。
四、加壳及脱壳代码实现
http://blog.csdn.net/jiazhijun/article/details/8809542
一、序言
在上篇“Android APK加壳技术方案”(http://blog.csdn.net/jiazhijun/article/details/8678399)博文中,根据加壳数据在解壳程序Dex文件所处的位置,我提出了两种Android Dex加壳技术实现方案,本片博文将对方案1代码实现进行讲解。博友可以根据方案1的代码实现原理对方案2自行实现。
在方案1的代码实现过程中,各种不同的问题接踵出现,最初的方案也在不同问题的出现、解决过程中不断的得到调整、优化。
本文的代码实现了对整个APK包的加壳处理。加壳程序不会对源程序有任何的影响。
二、代码实现
本程序基于Android2.3代码实现,因为牵扯到系统代码的反射修改,本程序不保证在其它android版本正常工作,博友可以根据实现原理,自行实现对其它Android版本的兼容性开发。
1、 加壳程序流程及代码实现
1、加密源程序APK为解壳数据
2、把解壳数据写入解壳程序DEX文件末尾,并在文件尾部添加解壳数据的大小。
3、修改解壳程序DEX头中checksum、signature 和file_size头信息。
代码实现如下:
[java] view plaincopy
package com.android.dexshell;
import java.io.ByteArrayOutputStream;
import java.io.File;
import java.io.FileInputStream;
import java.io.FileOutputStream;
import java.io.IOException;
import java.security.MessageDigest;
import java.security.NoSuchAlgorithmException;
import java.util.zip.Adler32;
public class DexShellTool {
/**
* @param args
*/
public static void main(String[] args) {
// TODO Auto-generated method stub
try {
File payloadSrcFile = new File("g:/payload.apk");
File unShellDexFile = new File("g:/unshell.dex");
byte[] payloadArray = encrpt(readFileBytes(payloadSrcFile));
byte[] unShellDexArray = readFileBytes(unShellDexFile);
int payloadLen = payloadArray.length;
int unShellDexLen = unShellDexArray.length;
int totalLen = payloadLen + unShellDexLen +4;
byte[] newdex = new byte[totalLen];
//添加解壳代码
System.arraycopy(unShellDexArray, 0, newdex, 0, unShellDexLen);
//添加加密后的解壳数据
System.arraycopy(payloadArray, 0, newdex, unShellDexLen,
payloadLen);
//添加解壳数据长度
System.arraycopy(intToByte(payloadLen), 0, newdex, totalLen-4, 4);
//修改DEX file size文件头
fixFileSizeHeader(newdex);
//修改DEX SHA1 文件头
fixSHA1Header(newdex);
//修改DEX CheckSum文件头
fixCheckSumHeader(newdex);
String str = "g:/classes.dex";
File file = new File(str);
if (!file.exists()) {
file.createNewFile();
}
FileOutputStream localFileOutputStream = new FileOutputStream(str);
localFileOutputStream.write(newdex);
localFileOutputStream.flush();
localFileOutputStream.close();
} catch (Exception e) {
// TODO Auto-generated catch block
e.printStackTrace();
}
}
//直接返回数据,读者可以添加自己加密方法
private static byte[] encrpt(byte[] srcdata){
return srcdata;
}
private static void fixCheckSumHeader(byte[] dexBytes) {
Adler32 adler = new Adler32();
adler.update(dexBytes, 12, dexBytes.length - 12);
long value = adler.getValue();
int va = (int) value;
byte[] newcs = intToByte(va);
byte[] recs = new byte[4];
for (int i = 0; i < 4; i++) {
recs[i] = newcs[newcs.length - 1 - i];
System.out.println(Integer.toHexString(newcs[i]));
}
System.arraycopy(recs, 0, dexBytes, 8, 4);
System.out.println(Long.toHexString(value));
System.out.println();
}
public static byte[] intToByte(int number) {
byte[] b = new byte[4];
for (int i = 3; i >= 0; i--) {
b[i] = (byte) (number % 256);
number >>= 8;
}
return b;
}
private static void fixSHA1Header(byte[] dexBytes)
throws NoSuchAlgorithmException {
MessageDigest md = MessageDigest.getInstance("SHA-1");
md.update(dexBytes, 32, dexBytes.length - 32);
byte[] newdt = md.digest();
System.arraycopy(newdt, 0, dexBytes, 12, 20);
String hexstr = "";
for (int i = 0; i < newdt.length; i++) {
hexstr += Integer.toString((newdt[i] & 0xff) + 0x100, 16)
.substring(1);
}
System.out.println(hexstr);
}
private static void fixFileSizeHeader(byte[] dexBytes) {
byte[] newfs = intToByte(dexBytes.length);
System.out.println(Integer.toHexString(dexBytes.length));
byte[] refs = new byte[4];
for (int i = 0; i < 4; i++) {
refs[i] = newfs[newfs.length - 1 - i];
System.out.println(Integer.toHexString(newfs[i]));
}
System.arraycopy(refs, 0, dexBytes, 32, 4);
}
private static byte[] readFileBytes(File file) throws IOException {
byte[] arrayOfByte = new byte[1024];
ByteArrayOutputStream localByteArrayOutputStream = new ByteArrayOutputStream();
FileInputStream fis = new FileInputStream(file);
while (true) {
int i = fis.read(arrayOfByte);
if (i != -1) {
localByteArrayOutputStream.write(arrayOfByte, 0, i);
} else {
return localByteArrayOutputStream.toByteArray();
}
}
}
}
2、 解壳程序流程及代码实现
在解壳程序的开发过程中需要解决如下几个关键的技术问题:
(1)解壳代码如何能够第一时间执行?
Android程序由不同的组件构成,系统在有需要的时候启动程序组件。因此解壳程序必须在Android系统启动组件之前运行,完成对解壳数 据的解壳及APK文件的动态加载,否则会使程序出现加载类失败的异常。
Android开发者都知道Applicaiton做为整个应用的上下文,会被系统第一时间调用,这也是应用开发者程序代码的第一执行点。因此通过对 AndroidMainfest.xml的application的配置可以实现解壳代码第一时间运行。
[html] view plaincopy
<application
android:icon="@drawable/ic_launcher"
android:label="@string/app_name"
android:theme="@style/AppTheme" android:name="<span style="color: rgb(255, 0, 0);"><em><strong>com.android.dexunshell.ProxyApplication</strong></em></span>" >
</application>
(2)如何替换回源程序原有的Application?
当在AndroidMainfest.xml文件配置为解壳代码的Application时。源程序原有的Applicaiton将被替换,为了不影响源程序代码逻辑,我们需要 在解壳代码运行完成后,替换回源程序原有的Application对象。我们通过在AndroidMainfest.xml文件中配置原有Applicaiton类信息来达到我们 的目的。解壳程序要在运行完毕后通过创建配置的Application对象,并通过反射修改回原Application。
[html] view plaincopy
<application
android:icon="@drawable/ic_launcher"
android:label="@string/app_name"
android:theme="@style/AppTheme" android:name="<em><strong><span style="color: rgb(255, 0, 0);">com.android.dexunshell.ProxyApplication</span></strong></em>" >
<span style="color: rgb(255, 0, 0);"><em><strong><meta-data android:name="APPLICATION_CLASS_NAME" android:value="com.***.Application"/></strong></em></span>
</application>
(3)如何通过DexClassLoader实现对apk代码的动态加载。
我们知道DexClassLoader加载的类是没有组件生命周期的,也就是说即使DexClassLoader通过对APK的动态加载完成了对组件类的加载, 当系统启动该组件时,还会出现加载类失败的异常。为什么组件类被动态加载入虚拟机,但系统却出现加载类失败呢?
通过查看Android源代码我们知道组件类的加载是由另一个ClassLoader来完成的,DexClassLoader和系统组件ClassLoader并不存在关 系,系统组件ClassLoader当然找不到由DexClassLoader加载的类,如果把系统组件ClassLoader的parent修改成DexClassLoader,我们就可 以实现对apk代码的动态加载。
(4)如何使解壳后的APK资源文件被代码动态引用。
代码默认引用的资源文件在最外层的解壳程序中,因此我们要增加系统的资源加载路径来实现对借壳后APK文件资源的加载。
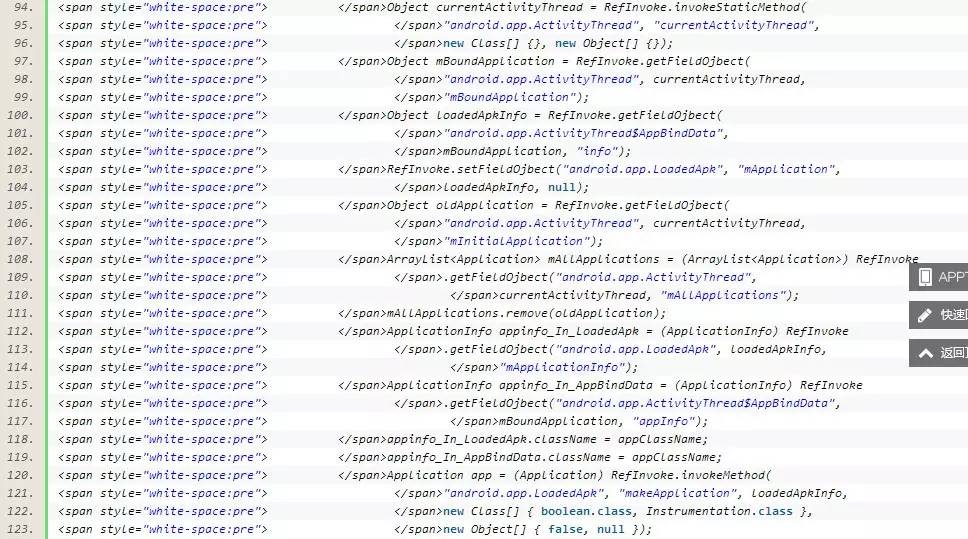
解壳实现代码:
[java] view plaincopy
package com.android.dexunshell;
import java.io.BufferedInputStream;
import java.io.ByteArrayInputStream;
import java.io.ByteArrayOutputStream;
import java.io.DataInputStream;
import java.io.File;
import java.io.FileInputStream;
import java.io.FileOutputStream;
import java.io.IOException;
import java.lang.ref.WeakReference;
import java.util.ArrayList;
import java.util.HashMap;
import java.util.Iterator;
import java.util.zip.ZipEntry;
import java.util.zip.ZipInputStream;
import dalvik.system.DexClassLoader;
import android.app.Application;
import android.content.pm.ApplicationInfo;
import android.content.pm.PackageManager;
import android.content.pm.PackageManager.NameNotFoundException;
import android.os.Bundle;
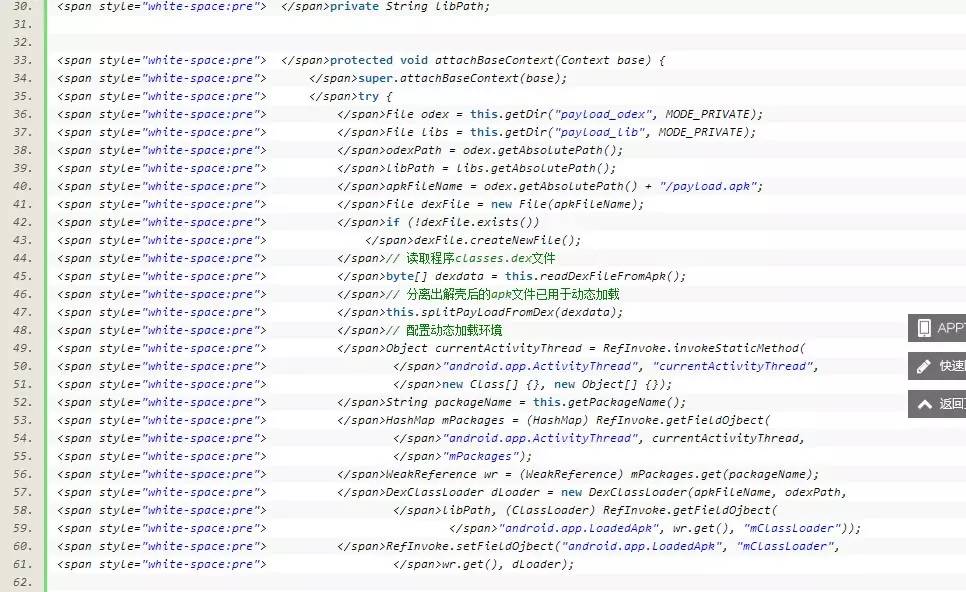
public class ProxyApplication extends Application {
private static final String appkey = "APPLICATION_CLASS_NAME";
private String apkFileName;
private String odexPath;
private String libPath;
protected void attachBaseContext(Context base) {
super.attachBaseContext(base);
try {
File odex = this.getDir("payload_odex", MODE_PRIVATE);
File libs = this.getDir("payload_lib", MODE_PRIVATE);
odexPath = odex.getAbsolutePath();
libPath = libs.getAbsolutePath();
apkFileName = odex.getAbsolutePath() + "/payload.apk";
File dexFile = new File(apkFileName);
if (!dexFile.exists())
dexFile.createNewFile();
// 读取程序classes.dex文件
byte[] dexdata = this.readDexFileFromApk();
// 分离出解壳后的apk文件已用于动态加载
this.splitPayLoadFromDex(dexdata);
// 配置动态加载环境
Object currentActivityThread = RefInvoke.invokeStaticMethod(
"android.app.ActivityThread", "currentActivityThread",
new Class[] {}, new Object[] {});
String packageName = this.getPackageName();
HashMap mPackages = (HashMap) RefInvoke.getFieldOjbect(
"android.app.ActivityThread", currentActivityThread,
"mPackages");
WeakReference wr = (WeakReference) mPackages.get(packageName);
DexClassLoader dLoader = new DexClassLoader(apkFileName, odexPath,
libPath, (ClassLoader) RefInvoke.getFieldOjbect(
"android.app.LoadedApk", wr.get(), "mClassLoader"));
RefInvoke.setFieldOjbect("android.app.LoadedApk", "mClassLoader",
wr.get(), dLoader);
} catch (Exception e) {
// TODO Auto-generated catch block
e.printStackTrace();
}
}
public void onCreate() {
{
// 如果源应用配置有Appliction对象,则替换为源应用Applicaiton,以便不影响源程序逻辑。
String appClassName = null;
try {
ApplicationInfo ai = this.getPackageManager()
.getApplicationInfo(this.getPackageName(),
PackageManager.GET_META_DATA);
Bundle bundle = ai.metaData;
if (bundle != null
&& bundle.containsKey("APPLICATION_CLASS_NAME")) {
appClassName = bundle.getString("APPLICATION_CLASS_NAME");
} else {
return;
}
} catch (NameNotFoundException e) {
// TODO Auto-generated catch block
e.printStackTrace();
}
Object currentActivityThread = RefInvoke.invokeStaticMethod(
"android.app.ActivityThread", "currentActivityThread",
new Class[] {}, new Object[] {});
Object mBoundApplication = RefInvoke.getFieldOjbect(
"android.app.ActivityThread", currentActivityThread,
"mBoundApplication");
Object loadedApkInfo = RefInvoke.getFieldOjbect(
"android.app.ActivityThread$AppBindData",
mBoundApplication, "info");
RefInvoke.setFieldOjbect("android.app.LoadedApk", "mApplication",
loadedApkInfo, null);
Object oldApplication = RefInvoke.getFieldOjbect(
"android.app.ActivityThread", currentActivityThread,
"mInitialApplication");
ArrayList<Application> mAllApplications = (ArrayList<Application>) RefInvoke
.getFieldOjbect("android.app.ActivityThread",
currentActivityThread, "mAllApplications");
mAllApplications.remove(oldApplication);
ApplicationInfo appinfo_In_LoadedApk = (ApplicationInfo) RefInvoke
.getFieldOjbect("android.app.LoadedApk", loadedApkInfo,
"mApplicationInfo");
ApplicationInfo appinfo_In_AppBindData = (ApplicationInfo) RefInvoke
.getFieldOjbect("android.app.ActivityThread$AppBindData",
mBoundApplication, "appInfo");
appinfo_In_LoadedApk.className = appClassName;
appinfo_In_AppBindData.className = appClassName;
Application app = (Application) RefInvoke.invokeMethod(
"android.app.LoadedApk", "makeApplication", loadedApkInfo,
new Class[] { boolean.class, Instrumentation.class },
new Object[] { false, null });
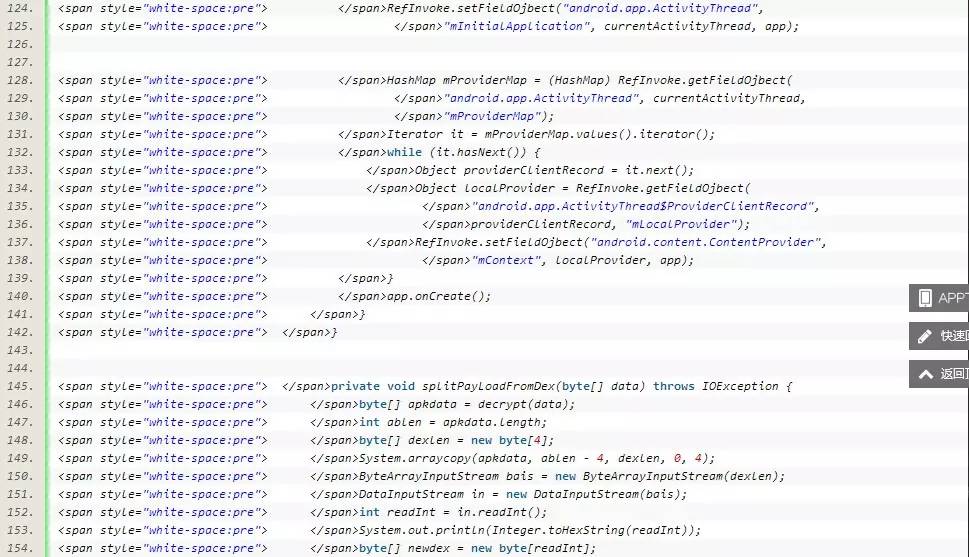
RefInvoke.setFieldOjbect("android.app.ActivityThread",
"mInitialApplication", currentActivityThread, app);
HashMap mProviderMap = (HashMap) RefInvoke.getFieldOjbect(
"android.app.ActivityThread", currentActivityThread,
"mProviderMap");
Iterator it = mProviderMap.values().iterator();
while (it.hasNext()) {
Object providerClientRecord = it.next();
Object localProvider = RefInvoke.getFieldOjbect(
"android.app.ActivityThread$ProviderClientRecord",
providerClientRecord, "mLocalProvider");
RefInvoke.setFieldOjbect("android.content.ContentProvider",
"mContext", localProvider, app);
}
app.onCreate();
}
}
private void splitPayLoadFromDex(byte[] data) throws IOException {
byte[] apkdata = decrypt(data);
int ablen = apkdata.length;
byte[] dexlen = new byte[4];
System.arraycopy(apkdata, ablen - 4, dexlen, 0, 4);
ByteArrayInputStream bais = new ByteArrayInputStream(dexlen);
DataInputStream in = new DataInputStream(bais);
int readInt = in.readInt();
System.out.println(Integer.toHexString(readInt));
byte[] newdex = new byte[readInt];
System.arraycopy(apkdata, ablen - 4 - readInt, newdex, 0, readInt);
File file = new File(apkFileName);
try {
FileOutputStream localFileOutputStream = new FileOutputStream(file);
localFileOutputStream.write(newdex);
localFileOutputStream.close();
} catch (IOException localIOException) {
throw new RuntimeException(localIOException);
}
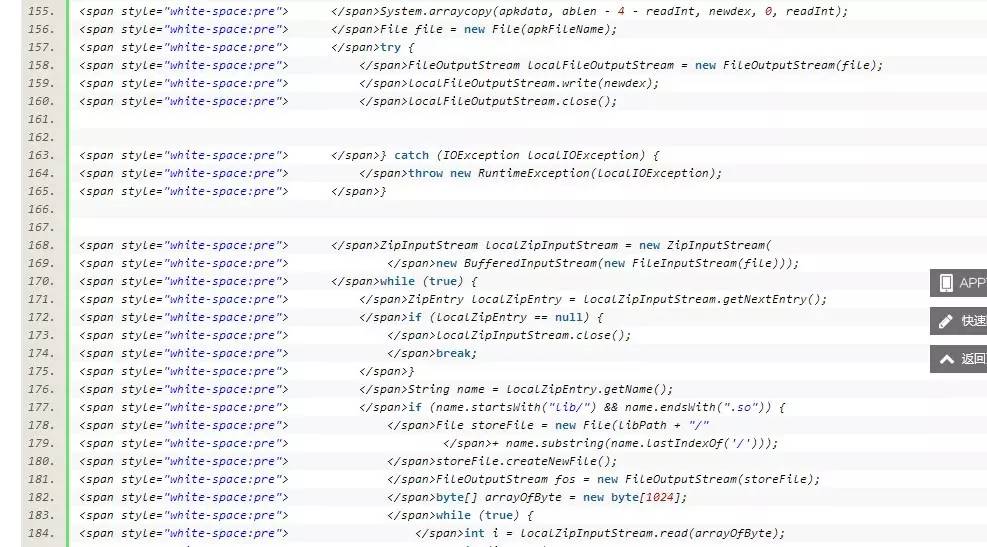
ZipInputStream localZipInputStream = new ZipInputStream(
new BufferedInputStream(new FileInputStream(file)));
while (true) {
ZipEntry localZipEntry = localZipInputStream.getNextEntry();
if (localZipEntry == null) {
localZipInputStream.close();
break;
}
String name = localZipEntry.getName();
if (name.startsWith("lib/") && name.endsWith(".so")) {
File storeFile = new File(libPath + "/"
+ name.substring(name.lastIndexOf('/')));
storeFile.createNewFile();
FileOutputStream fos = new FileOutputStream(storeFile);
byte[] arrayOfByte = new byte[1024];
while (true) {
int i = localZipInputStream.read(arrayOfByte);
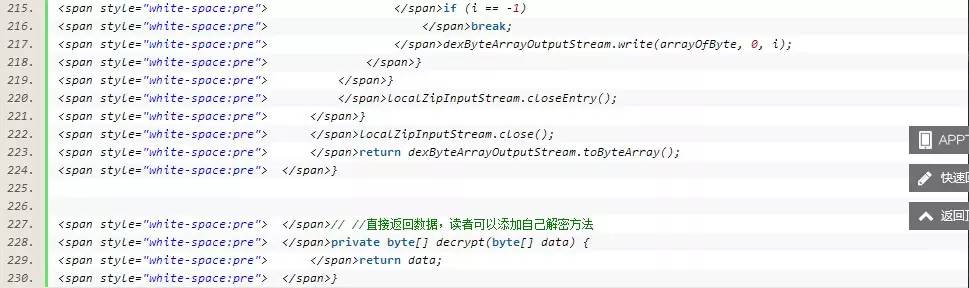
if (i == -1)
break;
fos.write(arrayOfByte, 0, i);
}
fos.flush();
fos.close();
}
localZipInputStream.closeEntry();
}
localZipInputStream.close();
}
private byte[] readDexFileFromApk() throws IOException {
ByteArrayOutputStream dexByteArrayOutputStream = new ByteArrayOutputStream();
ZipInputStream localZipInputStream = new ZipInputStream(
new BufferedInputStream(new FileInputStream(
this.getApplicationInfo().sourceDir)));
while (true) {
ZipEntry localZipEntry = localZipInputStream.getNextEntry();
if (localZipEntry == null) {
localZipInputStream.close();
break;
}
if (localZipEntry.getName().equals("classes.dex")) {
byte[] arrayOfByte = new byte[1024];
while (true) {
int i = localZipInputStream.read(arrayOfByte);
if (i == -1)
break;
dexByteArrayOutputStream.write(arrayOfByte, 0, i);
}
}
localZipInputStream.closeEntry();
}
localZipInputStream.close();
return dexByteArrayOutputStream.toByteArray();
}
// //直接返回数据,读者可以添加自己解密方法
private byte[] decrypt(byte[] data) {
return data;
}


RefInvoke为反射调用工具类:

三、总结
本文代码基本实现了APK文件的加壳及脱壳原理,该代码作为实验代码还有诸多地方需要改进。比如:
1、加壳数据的加密算法的添加。
2、脱壳代码由java语言实现,可通过C代码的实现对脱壳逻辑进行保护,以达到更好的反逆向分析效果。

以下文章点击文字直接进入:
1、Android apk防止反编译技术第一篇-加壳技术
2、每位Android开发人员不容错过的十大应用工具
3、如果让我重新设计一款Android APP
4、如何快速掌握一门新技术/语言/框架
5、Android酷炫实用的开源框架(UI框架)
6、Google将不再支持Android Eclipse Tools
7、Android终于官方支持按百分比来设置空间的宽高了
8、最全最强解析:支付宝钱包系统架构内部剖析(架构图)
9、【源码】jiandan煎蛋高仿也如此的专业
10、2015中国程序员生存报告,你苦你先看
11、如何给你的Android安装文件(APK)瘦身
12、Android Studio的一些小技巧
13、Android图标解决汇总

查看评论 回复
"AndroidAPK加壳技术方案【1】"的相关文章
- 上一篇:9个基于Java的搜索引擎框架
- 下一篇:Java多态性中的静态绑定和动态绑定