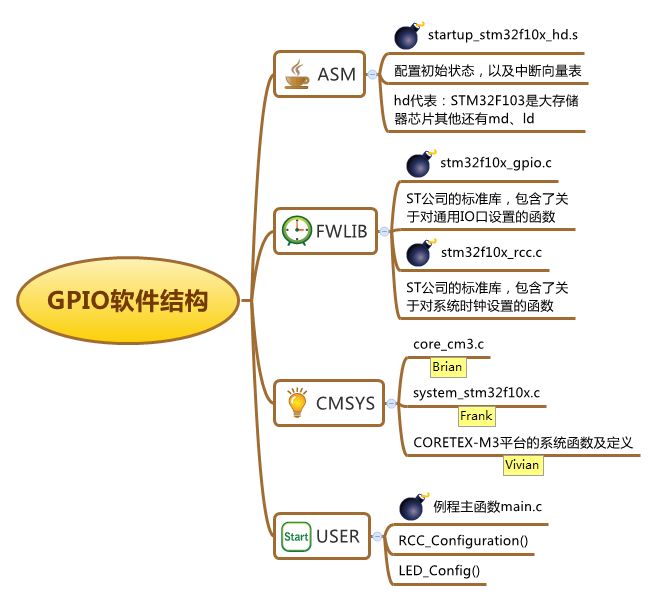
GPIOј°ЧоРЎҝтјЬ -
[өј¶Б]1ЎўGPIOУІјюҪб№№НјЈә2ЎўGPIOіМРтҪб№№Јә3ЎўҝтјЬҪйЙЬЈәХвАпөДASMКЗ№М¶ЁЖф¶ҜОДјюјРЈ¬startup_stm32f10x_hd.sұнКҫөұЗ°stm32АаРНОӘёЯИЭБҝЙиұёЈ¬өұИ»»№УРmd.sөИЎЈCMSYSОДјюјРПВөДБҪёцОДјюКЗ№М¶ЁөДЈ¬І»УГ№ЬЎЈFWlibКЗ№ӨіМЦРТӘ
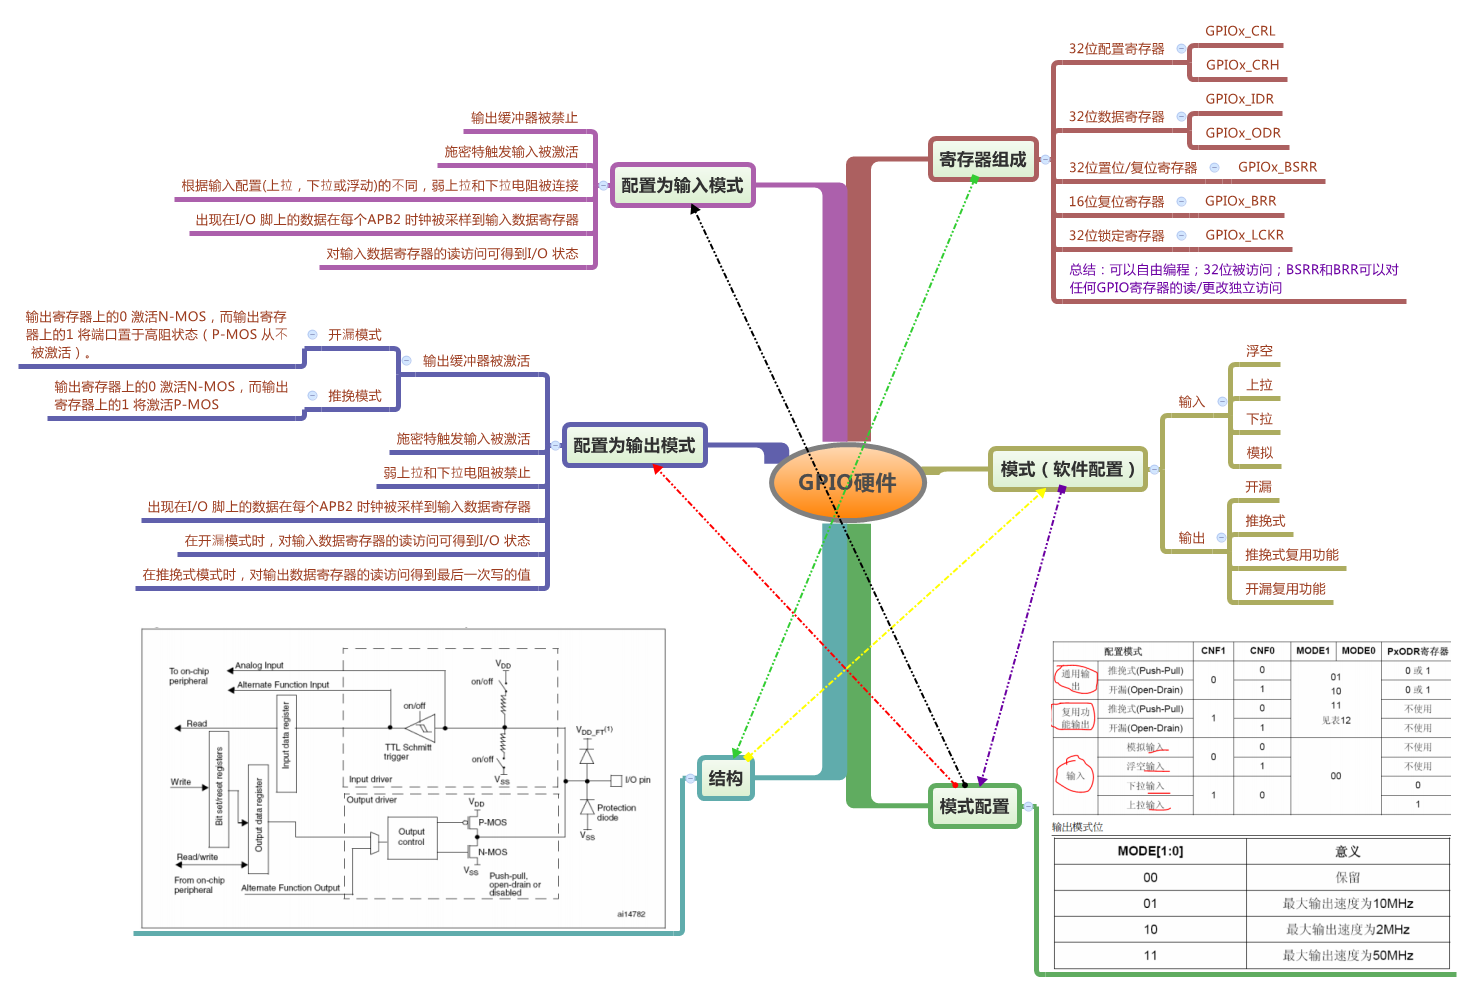
1ЎўGPIOУІјюҪб№№НјЈә
ұҫОДТэУГөШЦ·: http://www.21ic.com/app/mcu/201808/782651.htm
2ЎўGPIOіМРтҪб№№Јә
3ЎўҝтјЬҪйЙЬЈә
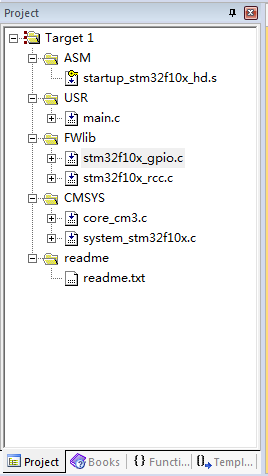
ХвАпөДASMКЗ№М¶ЁЖф¶ҜОДјюјРЈ¬startup_stm32f10x_hd.sұнКҫөұЗ°STM32АаРНОӘёЯИЭБҝЙиұёЈ¬өұИ»»№УРmd.sөИЎЈ
CMSYSОДјюјРПВөДБҪёцОДјюКЗ№М¶ЁөДЈ¬І»УГ№ЬЎЈ
FWlibКЗ№ӨіМЦРТӘУГөҪөДЙиұёөДОДјюЈ¬ТтОӘХвАпТӘУГөҪGPIOәНКұЦУК№ДЬЛщТФУГөҪБЛstm32f10x_gpio.cәНstm32f10x_rcc.cОДјюЈ¬Из№ыКЗЖдЛы№ӨіМТӘПаУҰјУИлЛщРиОДјюЎЈ
USRЦРөДmain.cҫНКЗЦчіМРтОДјюЈ¬ОТГЗТӘФЪАпГжРҙПаУҰ№ҰДЬЈ¬ЖдЛыОДјюТ»°гІ»УГРЮёДЈ¬ЦұҪУТэУГҫНәГЎЈ
4ЎўҙъВлЖ¬¶ОҪвОцЈә
4.1 ТэИләҜКэ
#include "stm32f10x.h"
ХвёцКЗУГ»§ОДјюЦРОЁТ»ТӘ°ьә¬әНРЮёДөДҝвәҜКэЈЎіэҙЛЦ®НвОТГЗ»№ТӘ°СОДјюstm32f10x_conf.hЧцПаУҰРЮёДЈәЈЁИзөЪ¶юРРЧўКНЛщКҫҫНКЗК№ДЬДгFWlibЦРТэИлөДОДјюЈ¬Хвёц·ЗіЈЦШТӘЈ¬Т»¶ЁІ»ТӘЙЩБЛЈ©
1 /* Includes ------------------------------------------------------------------*/
2 /* Uncomment the line below to enable peripheral header file inclusion */
3 /* #include "stm32f10x_adc.h" */
4 /* #include "stm32f10x_bkp.h" */
5 /* #include "stm32f10x_can.h" */
6 /* #include "stm32f10x_crc.h" */
7 /* #include "stm32f10x_dac.h" */
8 /* #include "stm32f10x_dbgmcu.h" */
9 /* #include "stm32f10x_dma.h" */
10 /* #include "stm32f10x_exti.h" */
11 /* #include "stm32f10x_flash.h" */
12 /* #include "stm32f10x_fsmc.h" */
13 #include "stm32f10x_gpio.h"
14 /* #include "stm32f10x_i2c.h" */
15 /* #include "stm32f10x_iwdg.h" */
16 /* #include "stm32f10x_pwr.h" */
17 #include "stm32f10x_rcc.h"
18 /* #include "stm32f10x_rtc.h" */
19 /* #include "stm32f10x_sdio.h" */
20 /* #include "stm32f10x_spi.h" */
21 /* #include "stm32f10x_tim.h" */
22 /* #include "stm32f10x_usart.h" */
23 /* #include "stm32f10x_wwdg.h" */
24 /* #include "misc.h" */ /* High level functions for NVIC and SysTick (add-on to CMSIS functions) */
4.2 ¶ЛҝЪәк¶ЁТе
1 #define LED1_ON GPIO_SetBits(GPIOB, GPIO_Pin_8);
2 #define LED1_OFF GPIO_ResetBits(GPIOB, GPIO_Pin_8);
3
4 #define LED2_ON GPIO_SetBits(GPIOD, GPIO_Pin_6);
5 #define LED2_OFF GPIO_ResetBits(GPIOD, GPIO_Pin_6);
6
7 #define LED3_ON GPIO_SetBits(GPIOD, GPIO_Pin_3);
8 #define LED3_OFF GPIO_ResetBits(GPIOD, GPIO_Pin_3);
ХвАпҫНКЗәк¶ЁТеPB8ЎўPD6ЎўPD3Иэёц¶ЛҝЪКдіцёЯөНөзЖҪЈ¬ХвСщФЪХв3ёц¶ЛҝЪҪУЙПLEDҫНДЬНЁ№эёшёЯөНөзЖҪҝШЦЖөЖөДББГрЎЈ
4.3 ПөНіКұЦУК№ДЬәҜКэ
1 void RCC_Configuration(void)
2 {
3 SystemInit();
4 }
ХвАпәҜКэКЗRCCіхКј»ҜЈ¬ХвАпЦ»өчУГҝвәҜКэіхКј»ҜБЛПөНіКұЦУ72Mhz
4.4 GPIOіхКј»ҜәҜКэ
1 void LED_Config(void){
2 GPIO_InitTypeDef GPIO_InitStructure;
3
4 RCC_APB2PeriphClockCmd(RCC_APB2Periph_GPIOB | RCC_APB2Periph_GPIOD , ENABLE);
5 GPIO_InitStructure.GPIO_Pin = GPIO_Pin_8; //LED1 V6 //Ҫ«V6,V7,V8 ЕдЦГОӘНЁУГНЖНмКдіц
6 GPIO_InitStructure.GPIO_Mode = GPIO_Mode_Out_PP;
7 GPIO_InitStructure.GPIO_Speed = GPIO_Speed_50MHz; //ҝЪПЯ·ӯЧӘЛЩ¶ИОӘ50MHz
8 GPIO_Init(GPIOB, &GPIO_InitStructure);
9
10 GPIO_InitStructure.GPIO_Pin = GPIO_Pin_6|GPIO_Pin_3; //LED2, LED3 V7 V8
11 GPIO_Init(GPIOD, &GPIO_InitStructure);
12 }
ХвАпКЗGPIOөДіхКј»ҜәҜКэЈ¬өЪ¶юРРКЗ¶ЁТеТ»ёцGPIOіхКј»ҜҪб№№МеЈ¬өЪЛДРРКЗК№ДЬGPIOBәНGPIODөДКұЦУЈ¬өЪ5-7РРКЗ¶ФGPIOіхКј»ҜҪб№№МеРЕПўөДМоідЈ¬ТӘёщҫЭЛщРиGPIOөДІ»Н¬КфРФҪшРРЙиЦГЈ¬өЪ8РРКЗөчУГҝвәҜКэGPIO_Init()¶ФGPIOB8ҪшРРіхКј»ҜЈ¬ІЙУГҪб№№МеөДРЕПўЈ¬Н¬СщөДөААнЈ¬АҙіхКј»ҜGPIOD6әНD3.
4.5 јтөҘСУКұәҜКэ
1 void Delay(__IO uint32_t nCount)
2 {
3 for(; nCount != 0; nCount--);
4 }
4.6 ЦчіМРт
1 int main(void)
2 {
3 RCC_Configuration(); //ПөНіКұЦУЕдЦГ
4 LED_Config(); //LEDҝШЦЖЕдЦГ
5 while (1)
6 {
7 LED1_ON; LED2_OFF; LED3_OFF; //LED1ББ LED2,LED3ГрЈЁLED2Ј¬LED3 ҪцV3Ј¬V2Ј¬V2.1°еУРЈ©
8 Delay(0xAFFFF);
9 LED1_OFF; LED2_ON; LED3_OFF; //LED2ББ LED1,LED3ГрЈЁLED2Ј¬LED3 ҪцV3Ј¬V2Ј¬V2.1°еУРЈ©
10 Delay(0xAFFFF);
11 LED1_OFF; LED2_OFF; LED3_ON; //LED3ББ LED1,LED2ГрЈЁLED2Ј¬LED3 ҪцV3Ј¬V2Ј¬V2.1°еУРЈ©
12 Delay(0xAFFFF);
13 }
14 }
ЎЎЎЎЎЎЎЎЎЎЎЎЎЎЎЎЎЎЎЎЎЎЎЎЎЎ ІйҝҙЖАВЫ »Шёҙ
"GPIOј°ЧоРЎҝтјЬ -"өДПа№ШОДХВ
- ЙПТ»ЖӘЈәavr proteus·ВХжөЪТ»ҝО:°ІЧ°ЙиЦГavr studioәНwinavr -
- ПВТ»ЖӘЈәөҘЖ¬»ъВЛІЁ -